
Image Steganography using Python - Javatpoint
The modern world of computation revolves around the word "Data". However, why is data so fascinating? In this modern world, people are starting to realize the significance of the data in order to expand the scope of their businesses. Business owners used data to potentially predict customer trends, increase sales, and push the organization to newer heights. With the help of the rapid advancement in technology and data for nonstop revolution, it has become the chief importance to secure data. Data sharing has also increased as thousands of messages and data are being transmitted on the internet day-to-day from one place to another. Data protection is the key concern of the sender, and, significantly, we encrypt the message in a secret method that only the receiver can understand.
In the following tutorial, we will understand the concept of Steganography along with its practical implementation using the Python programming language.
Steganography refers to the process of hiding a secret message within a larger one in such a manner that someone cannot know the presence or contents of the hidden message. The objective of Steganography is to maintain secret communication between two parties. Unlike Cryptography, where we can conceal the contents of a secret message, Steganography conceals the fact that a message is transmitted. Even though Steganography differs from Cryptography, there are various analogies between the two. Some authors classify Steganography as a form of Cryptography as hidden communication seems like a secret message.
As we know, Cryptography has always had its ultimate role in protecting the confidentiality between the sender and the expected receiver. However, the usage of the methods of Steganography besides Cryptography has increased gradually to include more protective layers to the hidden data. One of the benefits of utilizing Steganography over Cryptography alone is that the proposed secret message does not attract attention to itself as an object of scrutiny. Visible encrypted messages, no matter how unbreakable they are, arouse interest and may in themselves be convicting in countries where encryption is illegal.
The works of Steganography have been carried out on various transmission media, categorizing it into different types:
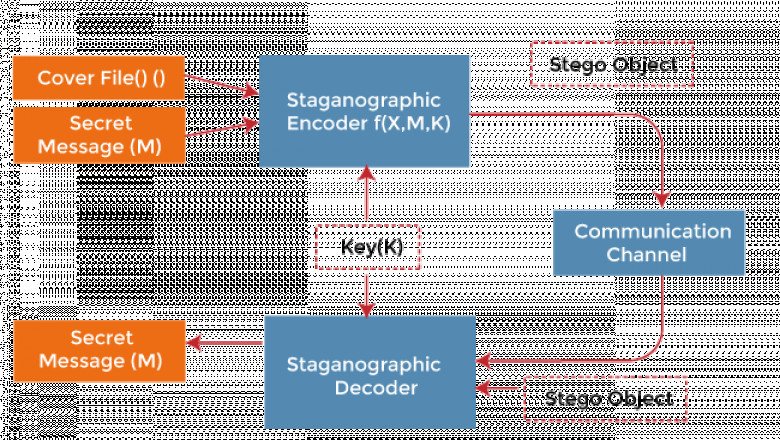
Now, let us understand the basic model of Steganography
As we can observe in the above image, both the actual file (X) and secret message (M) that must be hidden are fed into a steganographic encoder as input. Steganographic Encoder function, f(X, M, K) embeds the secret message into a cover image file using techniques like least significant bit encoding. The resulting stego image looks very similar to your cover image file, with no visible changes. This completes encoding. To retrieve the secret message, the stego object is fed into Steganographic Decoder.
This tutorial will support us in implementing image steganography with the help of the Python programming language. It will help us write Python script in order to hide text messages using a technique known as Least Significant Bit.
We can describe a digital image as a finite set of digital values, known as Pixels. Pixels are the smallest individual element of an image, holding values representing the brightness of a particular colour at any specific point. Thus, we can think of an image as a matrix (or a two-dimensional array) of pixels consisting of a static number of rows and columns.
LSB (or Least Significant Bit) is a method where we can modify the last bit of every pixel, replacing them with the data bit of the secret message.
From the above image, we can observe that if we alter the Most Significant Bit (or MSB), it will have a larger impact on the final values; however, if we alter the Least Significant Bit (or LSB), the impact on the final value is minimal. Hence, we use Least Significant Bit (LSB) Steganography.
Each pixel consists of three values - Red, Green, Blue. These values range from 0 to 255, which means that they are 8-bit values. Let us understand the working of this technique using an example. Suppose that we want to hide the message "hi" into an image of size 4x4, which has the pixel values as shown below:
With the help of the ASCII Table, we can convert the secret message into decimal values and then into a binary form: 0110100 0110101. Now, we can iterate through the pixel values one after one. Once we convert them into binary, we can replace each least significant bit with that message bits in a sequential manner (For instance, the binary of 225 is 11100001, we can then replace the last bit, the bit in the right (1), with the initial data bit (0) and so on). This will allow us to modify the values of the pixel by +1 or -1 only, which is not perceptible at all. The output values of the pixels after performing LSBS is as follows:
The following section mainly focuses on the step-by-step approach of the hide and reveal process with the help of a Python script.
The steps for this approach are as follows:
Step 1: Importing all the required Python libraries.
Step 2: Defining a function to convert any type of data into binary, we will use this to convert the secret data and pixels' values into binary in the encoding and decoding phase.
Step 3: Defining another function to hide a secret message in the image by changing the LSB.
Step 4: Writing a function to decode the hidden message from the Steganographic image.
Step 5: Writing another function that accepts the user's image name and secret message and calls the hide_data() function to encode the message.
Step 6: Defining a function to ask the user to enter the image name that requires decoded and call the show_data() function to return the decoded message.
Step 7: Defining the main function.
Let us see the above steps in action:
We will start by importing the necessary libraries that we need for the project. If any of the used libraries are not found in the system, install it using the pip installer.
Let us consider the following Python script to understand the same:
Example:
Explanation:
In the above snippet of code, we have imported the OpenCV library along with the NumPy and types libraries.
Now we will define a function in order to convert any type of data into binary. We will be using this method to convert the secret data and pixel values to binary in the encoding and decoding phase.
Let us consider the following Python script to understand the same:
Example:
Output:
Explanation:
In the above snippet, we have defined a function as msg_to_bin() that accepts the msg parameter in the form of data input by the user. We have then used the if-elif-else conditional statements to check the data type of the input secret data in the form of the message and image and convert them into Binary.
Once the conversion into the binary format is complete, we will define a function in order to hide a secret message in the image by changing the Least Significant Bit.
Let us consider the following script to understand the same:
Example:
Explanation:
In the above snippet of code, we have defined a function that accepts two parameters in the form of an image file and a secret message. We have then calculated the maximum bytes for encoding and checked if the number of bytes to encode is less than the maximum bytes in the image. We have then set the index of the data to 0 and converted the secret data into binary. We then found the length of data and used the for-loop to iterate through pixel values in the image, convert the RGB values to binary format, and hide the data for each pixel.
Now, we will write a function to decode the hidden message from the Steganographic image. Let us consider the following script to understand the same:
Example:
Explanation:
In the above snippet of code, we have defined the show_data() function that accepts the image file. Within this function, we have defined empty binary data and used the for-loop to iterate through the image pixels and convert the RGB pixels into binary format. We have also extracted the data from each pixel, and we have then split them by 8-bits and converted them to characters. At last, we checked the delimiter and removed it to display the actual hidden message.
We will now define a function that accepts the name of the image and secret message from the user. We will also call the hide_data() function in order to encode the message.
Let us consider the following script to understand the same:
Example:
Explanation:
In the above snippet of code, we have defined a function as encodeText() to encode the secret message along with the image. Within the function, we have asked the user for the name of the image file using the input() function and used the OpenCV library to read that file. We have then printed the details of the image along with the image itself. We have then asked the user for the text message to be encoded and the new file name for the encoded image. At last, we have called the hide_data() function in order to hide the secret message in the selected image.
Now, we will define a function to ask the user to enter the name of the image file that has to be decoded and call the show_data() function in order to return the decoded message.
Let us consider the following Python script illustrates the same:
Example:
Explanation:
In the above snippet of code, we have defined another function as decodeText() that allows the user to decode any image file. Within this function, we have asked the user for the name of the image file that has to be decoded and read the same using one of the functions of the OpenCV library. We have then resized the image and displayed the Steganographic image. We have also extracted the secret text data from the image file by calling the show_data() function and returning text for the users.
We will now set up the main function in order to commence the operation of image steganography. We will include a menu for the user to either encode the data or decode one and continue the execution afterward.
Let us consider the following Python script demonstrating the same:
Example:
# image ste
Explanation:
In the above snippet of code, we have defined the main function as steganography(). We created a menu within this function and asked the users for their input as 'int' data type. We have then used the if-elif-else conditional statements to execute the function as per the user input. At last, we have called this main function to execute the program.
Let us see the complete program code and the output after its execution.
File: imgSteganography.py
Output for Data Encoding:
Image Steganography 1. Encode the data 2. Decode the data Select the option: 1 Encoding... Enter image name (with extension): my_image.jpg The shape of the image is: (1080, 1920, 3) The original image is as shown below:
Output for Data Decoding:
Image Steganography 1. Encode the data 2. Decode the data Select the option: 2 Decoding... Enter the name of the Steganographic image that has to be decoded (with extension): testimage.jpg The Steganographic image is as follow:
Splunk
SPSS
Swagger
Transact-SQL
Tumblr
ReactJS
Regex
Reinforcement Learning
R Programming
RxJS
React Native
Python Design Patterns
Python Pillow
Python Turtle
Keras
Aptitude
Reasoning
Verbal Ability
Interview Questions
Company Questions
Artificial Intelligence
AWS
Selenium
Cloud Computing
Hadoop
ReactJS
Data Science
Angular 7
Blockchain
Git
Machine Learning
DevOps
DBMS
Data Structures
DAA
Operating System
Computer Network
Compiler Design
Computer Organization
Discrete Mathematics
Ethical Hacking
Computer Graphics
Software Engineering
Web Technology
Cyber Security
Automata
C Programming
C++
Java
.Net
Python
Programs
Control System
Data Mining
Data Warehouse
JavaTpoint offers too many high quality services. Mail us on [email protected], to get more information about given services.
JavaTpoint offers college campus training on Core Java, Advance Java, .Net, Android, Hadoop, PHP, Web Technology and Python. Please mail your requirement at [email protected]
Duration: 1 week to 2 weekWebsite Development
Android Development
Website Designing
Digital Marketing
Summer Training
Industrial Training
College Campus Training
Address: G-13, 2nd Floor, Sec-3
Noida, UP, 201301, India
Contact No: 0120-4256464, 9990449935
© Copyright 2011-2021 www.javatpoint.com. All rights reserved. Developed by JavaTpoint.


Comments
0 comment